Installing the APE CCT - How to identify the right tightness?
#1
 11-24-2009, 05:01 AM


Join Date: Nov 2009
Posts: 13
Likes: 0
Received 0 Likes
on
0 Posts
For those who don't want to read the rant, here's my underlying question.
Is it possible to cause severe damage by having the CCT either too tight or too lose when installing it using only your fingers?
I've read all the other threads (including the Sticky'd one in the F2 forum) to try and find how to identify the correct tightness. But they all lack detail on how to know when it's correctly adjusted. It seems so subjective to do the adjustments by ear.
My APE CCT arrived yesterday, and I just got around to installing it today.
I screwed it in finger-tight, then started the bike and the noise was gone. So I backed the CCT out until the noise came back, then turned it until the noise vanished, finally giving it a 1/4 turn after that.
However when I rolled on the throttle (I never went above 2000rpm, and my idle was set to 1200), I heard a kind of loud bang noise (akin to letting the clutch out too quick, or to shifting into 1st from neutral if your revs are too high) that definitely came from the chain. It would randomly go away when adjusting the CCT back and forth, but never seem to remain in one spot.
I never noticed the noise with the hydraulic tensioner (although I admit I wasn't really listening for it in as much detail with the OEM), and so I just lightly experimented with trying to get both the rattle and noise to disappear at the same time.
After about 10 minutes of this my bike stalled, similar to how it stalls when out of gas.
At this point I got scared, and decided to try putting the OEM CCT back in before trying to start it again, but now it won't go in. (I'm also scared of switching to reserve and trying to start it, just incase it's not a gas problem and damages my engine).
It seems like the tensioner slider is pushed closer to the hole than it used to be, and doesn't want to move far enough down for the OEM to completely fit inside. I don't want to force it back by tightening the manual CCT with a wrench either, just incase something has gone wrong.
I'm terrified that I've done some serious damage to the bike even when being so careful. Aside from the loudish noise that would sometimes occur when lightly rolling on the throttle, and the obvious CCT rattle, no other irregular noises occurred during installation.
Have I destroyed anything? Could my cam chain have been so loose that it'd slip off if the CCT wasn't tight enough? I didn't hear any valve-crunching or chain falling off as far as I know.
In retrospect I might not have tightened it enough, as the tightness could've just been when I reached the CCT O-ring. Or I could've tightened it too much, which still doesn't explain the loud noise.
I'm thinking of taking the head cover off tomorrow just check that the tensioner slider is still attached (and not stuck on anything).
Is there any chance that I'm just over-reacting?
I was hesitant to post this, because the instructions for installing the CCT are so straight forward in the F2 thread, and I feel like a complete idiot for not knowing if I've broken anything.
What would an over-tightened tensioner sound and feel like? What could the loud noise have been?
#2
11-24-2009, 06:17 AM
Senior Member & tensioner mod inventor ROTM WINNER FEB 2013
Bugger! That doesn't sound good.
My first thought is that it could have been a link in the chain its self has not straightened out properly after it's come round the crank or cams sprockets. I've seen that happen to my own chain. I'm currently rebuilding my 1KF engine and was surprised to see the link not want to straighten out when I was taking the thing apart. This may be due to wear on the chain but as it wasn't under tension at the time I had to put a lot of tension on it to get it to straighten. If this has anything to do with your 'bang' then it probably points to not enough tension. I hope for your sake its not the case.
I would definitely take the valve cover off and have a look in there before going any further.
#3
11-24-2009, 07:35 AM

Super Moderator
At this point I got scared, and decided to try putting the OEM CCT back in before trying to start it again, but now it won't go in.
#4
11-24-2009, 04:52 PM
Join Date: Nov 2009
Posts: 13
Likes: 0
Received 0 Likes
on
0 Posts
That's a relief. I'll build one of those tools now, and I think I'll take the cam cover off to install it the recommended APE way (and to inspect for any damage).
Standing from the right hand side of the bike, which direction does the engine run in? Clockwise or counterclockwise? I've read that I can turn the engine using the alternator bolt and a wrench. Is there an alternative way to turn it over? (excuse the pun).
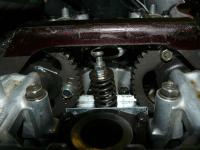
Is the 1/4" to 3/8" deflection I measure between the two cam sprockets at the top? Or deflection on one of the sides.
Could you please take a picture of the entire page 8-6 of the manual for me? I have a similar tensioner pic on the right, but my page in the pdf version is distorted. It's the only page this electronic manual seems to lack, and appears to be exactly the page I need.
Now that I look at it however, you may have a different service manual.
Once again thanks for your insight IDoDirt (and thanks for the suggestion Henry).
Standing from the right hand side of the bike, which direction does the engine run in? Clockwise or counterclockwise? I've read that I can turn the engine using the alternator bolt and a wrench. Is there an alternative way to turn it over? (excuse the pun).
Is the 1/4" to 3/8" deflection I measure between the two cam sprockets at the top? Or deflection on one of the sides.
Could you please take a picture of the entire page 8-6 of the manual for me? I have a similar tensioner pic on the right, but my page in the pdf version is distorted. It's the only page this electronic manual seems to lack, and appears to be exactly the page I need.
Now that I look at it however, you may have a different service manual.
Once again thanks for your insight IDoDirt (and thanks for the suggestion Henry).
Last edited by Zarflax; 11-24-2009 at 05:07 PM.
#5
11-24-2009, 10:32 PM
Super Moderator
If you go to StephyGee's web page she has the F3 manual (among others) available in PDF format for download. Then you can print any of the pages you like.
#6
11-25-2009, 04:25 AM
Join Date: Nov 2009
Posts: 13
Likes: 0
Received 0 Likes
on
0 Posts
It turns out that the bike was fine.
I took off the cam cover and adjusted the tensioner to give between 1/4" - 3/8" chain deflection between the two sprockets as the instructions recommended, then fine tuned it by about 30 degrees until I got the least amount of "ping".
The bolt is really sensitive to adjustments, and giving it a 1/4 turn adjusts the tension deflection by several millimeters, so I recommend installing it the "proper" way to anyone who has the time.
I think the ping might've always been there if I snap on the throttle rapidly, but perhaps just muffled by the fairings, and my lack of paying attention to it.
I could make a video if you'd like know what it sounds like.
The cam chain rattle seems to be mostly gone.
I guess the reason it stalled is because it ran out of gas, which is weird, as I put half a tank in about 60km earlier. I assume it's because my carbs are out of sync, causing it to chew through gas far more than I'm used to. Possibly combined with lighting making it look like there was more gas in the tank than I thought.
That's a huge relief anyway.
My bike's getting a new air filter and finally a carb sync tomorrow, using my home-made manometer w/ automatic transmission fluid. I tried once already, but it fluctuates a hell of a lot after even slightly adjusting the sync screws.
Thanks for the link too.
#8
11-26-2009, 02:56 AM

#9
11-27-2009, 05:34 AM
Join Date: Nov 2009
Posts: 13
Likes: 0
Received 0 Likes
on
0 Posts
I just used one of the many homemade manometer guides on the net.
My original looked identical to this one, except I used automatic transmission fluid:
http://www.r6messagenet.com/forums/r...sync-tool.html
With the 4-column manometer, my carbs appeared to be too far out of sync, and the adjustments I made seemed to have little effect on the balance of the tubes. If one cylinder was sucking less than the others, it'd drain the fluid fairly quickly from that, while the other 3 went up at varying speeds.
So I went back to the drawing board, reducing it to a 2-column one like this:
http://www.obairlann.net/reaper/moto...manometer.html
The manual refers to carb 3 as the base carb, so with some experimentation (and lots of trial and error), I synchronized each of the carbs to #3.
When I balanced one of my cylinders (#2 I think), it was perfect at idle, but would pull differently under constant throttle, losing synchronization as the revs increased.
So instead, I allowed for a slightly out of sync idle, with near-perfect synchronization at higher rpm.
If I made a video, it'd just be 4 hours of profanity and watching the tubes go back and forth as my screwdriver either slipped off the screws from lack of pressure, or as I opened the throttle plates from too much pressure.
The throttle sync screws are extremely sensitive, far more with the ATF than with the mercury/carb-sticks, so you need a much larger aparatus than the small handheld ones.
I tried adding some restricters (smaller inner-diameter hoses inside the hoses I used) to eliminate the 1/2 inch fluctuations I got, but they didn't really do anything.
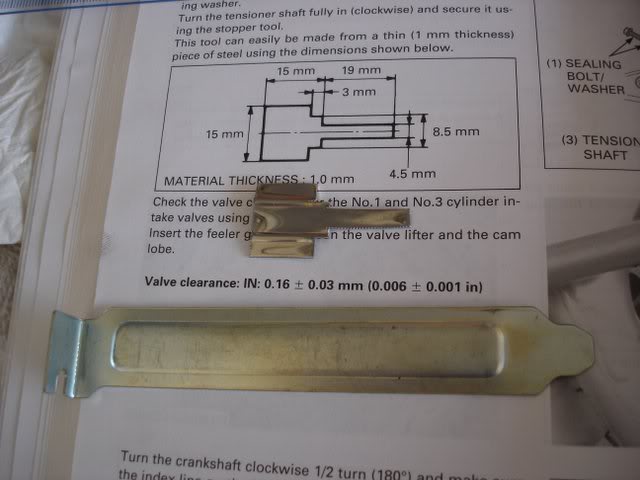
I still need to track down why intake 1 has less vacuum than the other 3 as rpm increases. I was meaning to check valve clearances while installing the APE (something recommended prior to balancing), but wasn't able to get a set of feeler gauges. So it'll have to wait another day, probably when I get new plugs.
I think it could be a vacuum leak somewhere, but I'm probably going to visit a carb specialist next week for some advice (along with a friend, who's paying the guy to have theirs done), and to compare my balance job to a carbtune one.
Now that they're almost perfectly balanced, my bike feels and sounds much smoother.
My idle used to fluctuate by about 300rpm either side of the idle speed, whereas now it sits right on 1200rpm, fluctuating by 100rpm at most once every 10 or so seconds.
I'm still overdue for new plugs and a new air filter, but as it stands, my bike now runs smoother (and pulls harder) than many $tealer bikes I've tested with the same displacement. It runs far better than when I bought it too.
I also still need to re-adjust the pilot screws after removing them, and probably re-balance.
Berdel: I can make a video of how the bike sounds with the APE. But I won't put the OEM tensioner lifter back on for a video comparison just yet, as the last 2 weeks of carb tuning have drained me.
I've been dying to just ride it all week, and went for two 3-hour rides over the last two days.
I might put it back on when I do some more carb tuning over the coming weeks, just so I can compare the two.
If anything, the APE gives me peace of mind.
My original looked identical to this one, except I used automatic transmission fluid:
http://www.r6messagenet.com/forums/r...sync-tool.html
With the 4-column manometer, my carbs appeared to be too far out of sync, and the adjustments I made seemed to have little effect on the balance of the tubes. If one cylinder was sucking less than the others, it'd drain the fluid fairly quickly from that, while the other 3 went up at varying speeds.
So I went back to the drawing board, reducing it to a 2-column one like this:
http://www.obairlann.net/reaper/moto...manometer.html
The manual refers to carb 3 as the base carb, so with some experimentation (and lots of trial and error), I synchronized each of the carbs to #3.
When I balanced one of my cylinders (#2 I think), it was perfect at idle, but would pull differently under constant throttle, losing synchronization as the revs increased.
So instead, I allowed for a slightly out of sync idle, with near-perfect synchronization at higher rpm.
If I made a video, it'd just be 4 hours of profanity and watching the tubes go back and forth as my screwdriver either slipped off the screws from lack of pressure, or as I opened the throttle plates from too much pressure.
The throttle sync screws are extremely sensitive, far more with the ATF than with the mercury/carb-sticks, so you need a much larger aparatus than the small handheld ones.
I tried adding some restricters (smaller inner-diameter hoses inside the hoses I used) to eliminate the 1/2 inch fluctuations I got, but they didn't really do anything.
I still need to track down why intake 1 has less vacuum than the other 3 as rpm increases. I was meaning to check valve clearances while installing the APE (something recommended prior to balancing), but wasn't able to get a set of feeler gauges. So it'll have to wait another day, probably when I get new plugs.
I think it could be a vacuum leak somewhere, but I'm probably going to visit a carb specialist next week for some advice (along with a friend, who's paying the guy to have theirs done), and to compare my balance job to a carbtune one.
Now that they're almost perfectly balanced, my bike feels and sounds much smoother.
My idle used to fluctuate by about 300rpm either side of the idle speed, whereas now it sits right on 1200rpm, fluctuating by 100rpm at most once every 10 or so seconds.
I'm still overdue for new plugs and a new air filter, but as it stands, my bike now runs smoother (and pulls harder) than many $tealer bikes I've tested with the same displacement. It runs far better than when I bought it too.
I also still need to re-adjust the pilot screws after removing them, and probably re-balance.
Berdel: I can make a video of how the bike sounds with the APE. But I won't put the OEM tensioner lifter back on for a video comparison just yet, as the last 2 weeks of carb tuning have drained me.
I've been dying to just ride it all week, and went for two 3-hour rides over the last two days.
I might put it back on when I do some more carb tuning over the coming weeks, just so I can compare the two.
If anything, the APE gives me peace of mind.
#10
11-27-2009, 07:40 PM
Super Moderator
I just used one of the many homemade manometer guides on the net.
My original looked identical to this one, except I used automatic transmission fluid:
http://www.r6messagenet.com/forums/r6-how-guides/136367-how-make-your-own-carb-sync-tool.html
My original looked identical to this one, except I used automatic transmission fluid:
http://www.r6messagenet.com/forums/r6-how-guides/136367-how-make-your-own-carb-sync-tool.html
Do I think it's likely, no not really. But the potential is there for that to happen, so just a word of caution is justified. I'm glad to hear that it's running better. Good job.